


Fall Yarn Wreath
I love yarn wreaths - they're cute, relatively easy and affordable to make and incredibly versatile for all seasons. I decided to make a fall wreath using deep, rich earth tones like burgundy, chocolate brown, forest green, saffron yellow, etc.

What you'll need ~
- Styrofoam wreath form (10" - 12")
- Sheets of felt in fall colors you like (brown, burgundy, etc.)
- Multicolored yarn in fall colors to match your felt (I used Red Heart Super Saver acrylic yarn in Cherry Cola)
- Coordinating satin ribbon (about 1" width)
- Buttons, silk autumn leaves and other fall embellishments of your choice
- Hot glue
- Scissors
How to make it ~
I started this project by wrapping the styrofoam wreath form with the yarn. By choosing a multicolored yarn, this is a lot easier and goes a lot faster. Start by placing a dot of hot glue on the back of the wreath form and attaching an end of the yarn.
Once the glue is dry, start wrapping the yarn around the wreath. I did this project in stages, so I found that when I reached a stopping point in wrapping the yarn, it was easier to snip off the yarn and glue it in place. That way, I didn't have to worry about it unraveling in between sessions and could start with a fresh piece of yarn the next time around.
If you're working on this in one sitting, you can wait until the very end to glue the yarn in place. So, now your wreath should be completely covered in yarn. If you find any gaps, you can go back with short pieces of yarn to fill in the space - just hide the "evidence" by gluing it in place on the back of the wreath.
Set your wreath aside for later ~ it's time to work on all the embellishments.
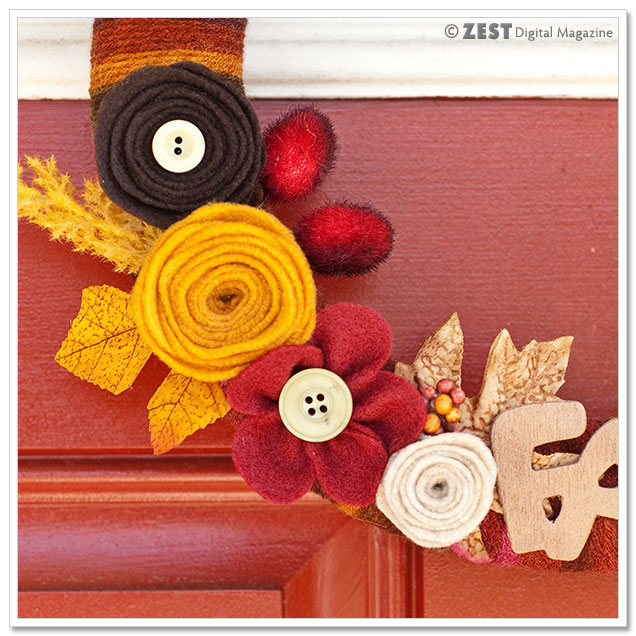
Felt Flowers ~
I made two types of felt flowers, but you can do whatever you prefer. Let's start with the felt "rosettes."
First, find something round with a 3" to 4" diameter to trace a circle onto your felt. I'd recommend using a ballpoint pen rather than a marker to trace the circle. Next, cut out the circle with nice, sharp scissors.
Take your circle and start cutting a spiral from the outer edge to the center. You'll be cutting in a counter-clockwise motion, and you can cut in a little bit of a wavy pattern as you work your way around the spiral. Leave a little circle of felt uncut in the center (this is the "base" of your felt flower).
Once you're done cutting, you'll want to heat up your glue gun. Starting with the outer tip of your coil, start rolling the felt in on itself in a clockwise motion (towards you).
When all the felt is rolled up, you'll have a little felt flower. You can push down the center of the flower just a bit with your finger to give the outer "petals" a little depth and dimension. Hold your coiled felt together and place a dab of glue on the round circle of felt on the bottom of the flower and attach it to the coil you're holding.
Once your glue is dry, your flower should not come unwound - if it does, you need to make sure you put enough glue to hold it together.
So, once I had a few felt rosettes in different colors, I chose buttons to glue in the center.
For the other felt flower, you'll need to do a tiny bit of sewing. Take a full sheet of felt and cut out a scalloped strip from the long side of the felt. In other words, you should have a straight edge on the bottom of the strip and a scalloped edge on the top of the strip. You'll want the "scallops" to be fairly wide, as they are the "petals" of the flower (maybe an 1" or so wide).
Next, grab a needle and thread, tie a knot in the end of the thread, and start making big stitches (starting on the right end) near the bottom straight edge of the felt. As you make the stitches, the felt will start to curl and pucker as it folds in on itself.
Once you reach the left end of the felt strip with your stitches, pull tightly and the felt will come together into a flower shape. Finish it off by securing both ends.
Embellishments ~
You can create as many, or as few, felt flowers as you like. Then, move on to some additional fall elements. The sky is really the limit here - add whatever you enjoy!
I opted for some silk fall leaves I had hanging around, as well as some little doodads from fall floral arrangements. I also picked up a wooden "Fall" accent at The Hobby Lobby for $0.50 and spray painted it with Rust-oleum American Accent Craft & Hobby Enamel in Burnished Copper Metal.
Now, once you have all your embellishments picked out, you can either glue them in place with hot glue, or you can do what I did: I took craft pins and pinned the elements in place (with the exception of the "Fall" piece since it was wooden) so that you can switch things up next fall, if you so choose.
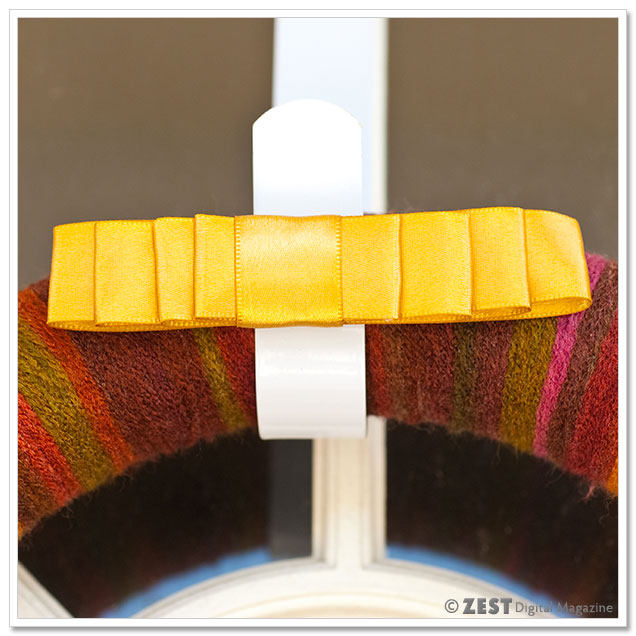
Bow ~
Again, your choice of bow and how you want to display your wreath is completely up to you, but I decided to do something a little different and made a "Dior"-style bow with my satin ribbon.
You'll need to cut five lengths of ribbon. I did 4, 6, 8, 10 and 12-inch lengths. Make sure your hot glue is ready, and form each length (EXCEPT the shortest piece) into a loop, gluing on the inside of the loop.
Starting with the largest loop on the bottom, stack the other loops in decreasing size on top of it and glue them together in the center by placing a tiny dot of glue in between each loop.

Once you have your stack of loops, take the shortest ribbon length and wrap it around the center, gluing it on the underside of the bow. Ta-da!
Again, I chose to pin the bow on instead of glue it so that it would be easier to get the wreath hanger on and off - but that choice is up to you. I would recommend only displaying the wreath inside, since it's not weatherproof!
So, there you have it - a cute yarn wreath to show off through Thanksgiving. Enjoy!
--- This project was created by Erika Pitera, the managing editor and art director here at ZEST


Leave a comment