


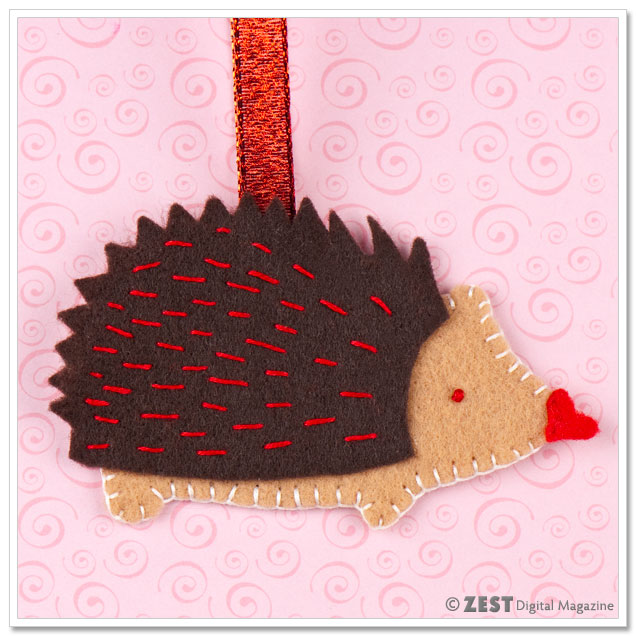
Hedgehog Valentine's Day Ornament
Love is in the air for all creatures big and small! I adore Valentine's Day and thought, "What better way to celebrate than with a handmade ornament?" It may not be as satisfying as chocolate, but I think the cuteness factor more than makes up for it. Keep reading for complete step-by-step instructions and photos for my little hedgehog of love! He measures about 4" wide and 2-1/2" tall (excluding hanger).
What you'll need ~
- Brown, tan and red felt
- Red and white 6-strand embroidery floss
- Coordinating red ribbon
- Scissors
- Needle
- Hot glue gun
- Template for hedgehog (click to download)
- Freezer paper and permanent marker
How to make it ~
If you're going to use our downloadable template, go ahead and print it out. Next, I took a piece of freezer paper and traced my shapes onto the paper side (not the shiny side) with a marker.
Cut the shapes out of the freezer paper. For each hedgie you're making, you'll need two tan body shapes, one brown back shape and one red heart shape.
To easily cut them out of the felt, place your freezer paper stencil shiny side down on the appropriate felt color, turn an iron on low heat and iron the paper for a few seconds. The freezer paper stencil should be sticking to the felt, so you can cut out the shape with sharp scissors, peel off the paper stencil and repeat as necessary.
Once you have all of your felt shapes cut out, you can start assembling the ornament. I wanted my hedgie to be flat, so I didn't stuff him - though you certainly could if you wanted to.
Start with one of the tan body pieces. Take your needle and a 6" to 8" length of red embroidery floss (separated into a section of 3 strands. If you try to do this at the end of the floss, you'll wind up with a tangled mess. Just gently pull apart at the middle, and you'll have two sections!). Knot the end and use a few small stitches to attach the heart to the hedgie's nose. Finish off with a small knot.
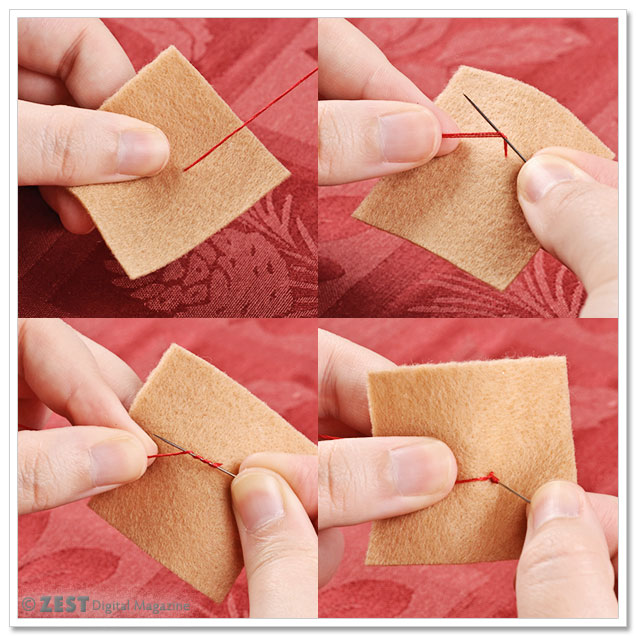
I used a French knot to create the eye, which is fairly simple. Use the remainder of your short length of red floss and knot the end. Decide where you want his eye to be, then bring the needle up through the felt to the front (1). Next, wrap the thread around your needle about three or four times, keeping the tension taut (2 & 3).
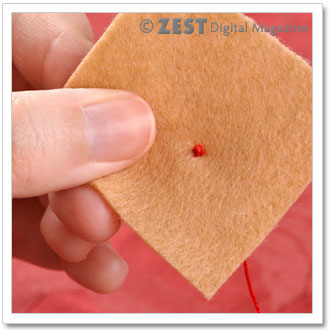
Push the needle back down through the felt just barely to the left of where it came out (4), continuing to hold the thread tightly in your fingers. Pull the needle all the way through to the back (through the knot) and you'll have a cute little eye! Finish off again with a knot in the back.
Next, it's time to start working on the hedgehog's back and spines - the brown piece of felt. After a little trial and error, I decided it was best to start with a rounded edge for the back piece (hence the shape on the downloadable template) and then hand cut the little spikes afterwards.
So, before cutting the spikes on the back piece and attaching it to the body, I decided I would stitch the red spines first. Take a longer piece of your red embroidery floss (three strands again) and stitch the spines, starting near the bottom of the brown felt. There's really no scientific approach here - just do what you like the looks of. I would just recommend varying the length of each stitch slightly to give it visual interest. Finish off with a knot when you're done.
When you're satisfied with your stitched spines, heat up your hot glue gun and attach the piece to the hedgehog body (the front piece with eye and nose). Then, using very sharp scissors, snip little triangular cuts out of the dark brown felt to create the look of spikes. Be sure you don't go too deep - you don't want to see the tan body through the spines.
Now that the hedgehog's details are complete, you can sew the two body pieces together. I switched over to three strands of the white embroidery floss for this, though you can stick with the red if you prefer.
You might want to pin the two halves together to make sewing easier. I used a blanket stitch to sew the body together (see more detailed instructions below, if you need them). You can start anywhere on the body, just be sure to leave space for your ribbon at the top.
Cut a 6" or so piece of ribbon and fold it into a loop. I did a blanket stitch up until where I wanted the ribbon hanger, then switched to a few small stitches to hold the ribbon in place, and finally resumed the blanket stitch on the other side of the ribbon.
There you have it! Your very own hedgie Valentine's Day ornament. Feel free to make him a matching girlfriend ~ you could use pink instead of red for her!
Blanket Stitch Instructions ~
Learning the blanket stitch is super easy, trust me. I used to swear I would never be able to sew, but this came to me pretty easily after a little practice. You might want to test the stitch on scrap fabric until you're comfortable with it and are getting nice, even stitches.
Here are my completely non-technical directions for the stitch (though there are plenty of video tutorials online if you're more comfortable learning that way): Start with a nice long length of embroidery floss and knot the end. Pull the needle up through the front of the top half of the two pieces you're planning to sew together ~ I've had pretty good luck stitching about 1/8" or so away from the edge of the felt.
Put the two pieces of felt together (wrong sides facing each other), and insert the needle between 1/8" and 1/4" to the left of where you started. Pull the floss almost all the way through, leaving a nice little loop sticking out. Put your needle through the loop (moving from the back to the front) and tighten somewhat. For your first stitch, leave it a little on the loose side (this comes in handy later).
Continue in the same fashion: insert needle to the left of the last stitch; pull through toward back most of the way; insert needle through loop and pull through toward front. Easy, right? Just keep your stitches as uniform as you can so it looks nice and pretty!
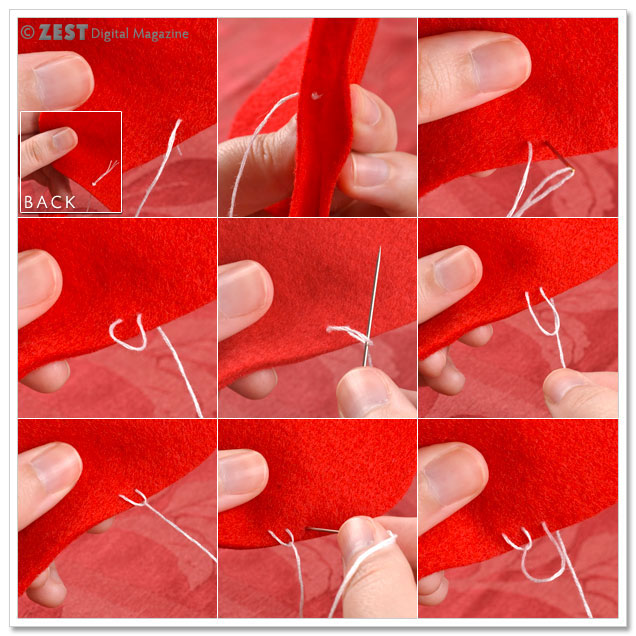
These next images and instructions are for if you encounter corners to stitch around, as well as how to finish off the last stitch.
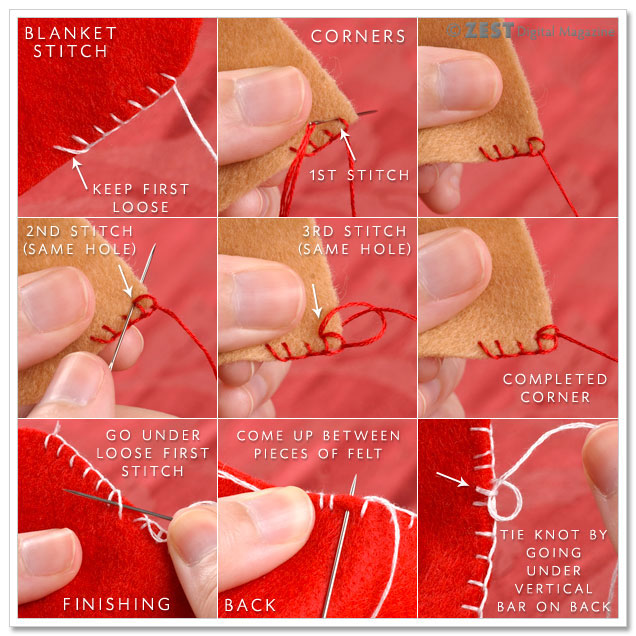
When you reach a corner, imagine a square on that corner. Place your last stitch where the bottom, inner corner would be on that square. You're going to insert your needle in that exact same spot and complete a second stitch - this will give you a diagonal line through your imaginary square.
Now, go through that same spot one more time (3rd stitch) and complete a stitch to give you another line across the bottom of your imaginary square. Now that you've rounded the corner, you can continue with your blanket stitches as usual.
When you've stitched all the way around your felt and are ready to wrap up, you'll be using that loose first stitch again (See? Told you it'd be handy). Insert the needle under that "almost-diagonal" first vertical bar and pull through.

Flip your felt over so you're looking at the back - you'll see the perfect spot for your next stitch. Insert the needle there but only through the back layer of the felt so that when you pull through, you come up through the top, in between both pieces of felt. Pull nice and tight.
Lastly, insert your needle under that vertical bar you just created on the back and make a knot. Insert your needle in between the two pieces of felt and pull through at another spot (wherever you want) so you're hiding the knot and tail end of the floss. If you need to, you can always snip the thread and use the needle to gently tuck it away inside so you can't see it. That's it!
--- This project was created by Erika Pitera, the managing editor and art director here at ZEST


Too cute! Pinned him!
(1)Posted by: Lisa Weidknecht - 01/18/13 | Reply
Thanks Lisa!